Crispy Cottage Cheese Chips – Easy & Delicious Recipe
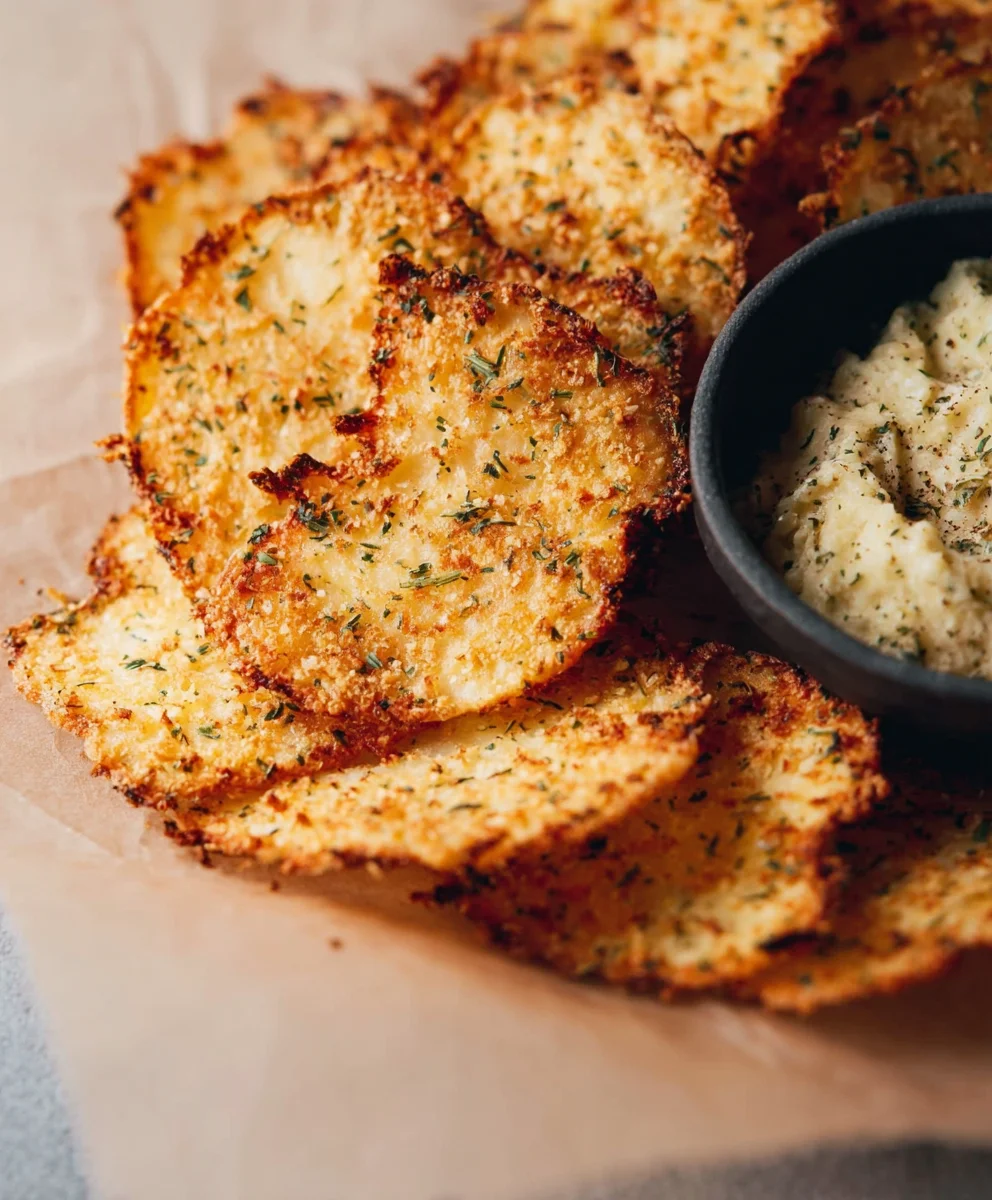
Crispy Cottage Cheese Chips are about to become your new favorite healthy snack obsession. Forget those store-bought alternatives loaded with questionable ingredients and artificial flavors. We’re talking about a simple, yet incredibly satisfying treat that you can whip up right in your own kitchen. What’s not to love about these delightfully crunchy morsels? They offer that perfect salty, savory bite without the guilt, making them an ideal companion for your afternoon slump, a movie night indulgence, or even a unique appetizer. The magic of these Crispy Cottage Cheese Chips lies in their surprising simplicity and the wonderful texture they achieve. The humble cottage cheese transforms into something truly special – light, airy, and wonderfully crisp, proving that healthy eating doesn’t have to mean sacrificing deliciousness. Get ready to discover how easy it is to create these addictive little wonders!
Ingredients:
- 1 cup cottage cheese (small curds, drained well)
- ¼ teaspoon garlic powder
- ¼ teaspoon onion powder
- ½ teaspoon dried herbs (optional, such as thyme, parsley, or a mix)
- Salt and freshly ground black pepper to taste
- Olive oil spray
Preparing the Cottage Cheese Base
The foundation of our incredibly satisfying Crispy Cottage Cheese Chips lies in properly preparing the cottage cheese. It’s essential to use small curd cottage cheese for the best texture and to ensure it’s drained thoroughly. You might be surprised at how much liquid can be released, even from “drained” cottage cheese. I like to place the cottage cheese in a fine-mesh sieve set over a bowl and let it sit for at least 15-20 minutes, or even gently press down on it with a spoon to expel excess moisture. This step is crucial for achieving that desirable crispiness; if there’s too much water, the chips will steam rather than bake and crisp up. Once drained, transfer the cottage cheese to a medium-sized bowl.
Now, it’s time to infuse our cottage cheese base with flavor. Add the garlic powder and onion powder directly to the bowl. These two common pantry staples provide a savory depth that complements the mild tang of the cottage cheese perfectly. Next, if you’re opting for dried herbs, sprinkle them in. A little goes a long way, so the ½ teaspoon is a good starting point. Thyme offers an earthy, slightly minty note, while parsley provides a fresh, herbaceous brightness. Feel free to experiment with other dried herbs you enjoy, such as oregano, chives, or even a pinch of Italian seasoning. Finally, season generously with salt and freshly ground black pepper. Remember that cottage cheese can be a bit bland on its own, so don’t be shy with the salt – it really wakes up all the flavors. Taste a tiny bit of the seasoned cottage cheese mixture (before baking, of course!) to adjust the salt and pepper as needed. You want a well-balanced flavor profile.
Gently mix all the ingredients together until they are well combined. You’re not looking to whip it into a smooth paste; rather, you want an evenly distributed mixture where all the seasonings are incorporated into the curds.
Forming and Baking the Chips
With our flavorful cottage cheese mixture ready, it’s time to form the chips and get them into the oven. Preheat your oven to a relatively moderate temperature, around 375°F (190°C). This temperature is high enough to encourage crisping but not so high that the chips burn before they dry out. Line a large baking sheet with parchment paper. This step is non-negotiable for preventing sticking and making cleanup a breeze. If you don’t have parchment paper, you can lightly grease the baking sheet, but parchment paper is highly recommended for best results.
Now, for shaping the chips. You have a few options here, depending on the look and size you desire. The easiest method is to dollop small spoonfuls of the cottage cheese mixture onto the prepared baking sheet, leaving about 1-2 inches between each dollop. These will spread slightly as they bake. For a more uniform shape, you can use a small cookie scoop, ensuring each scoop is roughly the same size for even cooking. If you want thinner, flatter chips, you can gently spread each dollop with the back of the spoon or a small offset spatula. Aim for a thickness of about ¼ inch. Don’t worry if they aren’t perfectly round; rustic charm is part of their appeal! Ensure you don’t overcrowd the baking sheet; it’s better to use two sheets if necessary to allow for good air circulation around each chip, which is key to achieving that desired crispiness.
Once all your chips are formed on the baking sheet, it’s time for a light coating of olive oil spray. This might seem counterintuitive since cottage cheese already has some fat, but a light mist of olive oil helps them crisp up beautifully and achieve a lovely golden-brown hue. Just a quick, even spray over the entire surface of the chips.
Place the baking sheet into the preheated oven. The baking time will vary depending on the size and thickness of your chips, as well as your oven’s individual calibration. Start by setting a timer for 15 minutes.
Achieving Perfect Crispiness
After the initial 15 minutes of baking, it’s time to check on our Crispy Cottage Cheese Chips. You’re looking for them to start turning golden brown around the edges and for the moisture to have visibly reduced. Carefully remove the baking sheet from the oven. At this point, you might notice that some chips are more golden than others. This is perfectly normal. For even cooking and crisping, I like to gently flip each chip using a thin spatula. This allows the other side to also brown and crisp up. If any chips are already nicely browned and crisp, you can remove them from the baking sheet and place them on a wire rack to cool while the remaining chips continue to bake.
Return the baking sheet to the oven and continue baking for another 5-10 minutes, or until the chips are golden brown and feel firm to the touch. Keep a close eye on them during this final stage, as they can go from perfectly crisp to burnt very quickly. You want them to have a satisfying crunch when you bite into them, not be soft or chewy.
Once they’ve reached your desired level of crispness, remove the baking sheet from the oven. The chips will continue to crisp up as they cool. Carefully transfer the Crispy Cottage Cheese Chips to a wire cooling rack to cool completely. This is an important step; if you leave them on the hot baking sheet, they can continue to cook and potentially become too hard or even burn from residual heat. Allow them to cool for at least 10-15 minutes before handling them further. You’ll know they are ready when they are cool enough to touch and have a noticeable snap when broken. If any still feel slightly soft, you can pop them back into the oven for a few extra minutes on low heat, or even under a broiler for a minute or two (watching them very carefully!).

Conclusion:
And there you have it – your guide to creating incredibly delicious and satisfying Crispy Cottage Cheese Chips! We’ve walked through the simple steps to transform humble cottage cheese into a wonderfully light and crunchy snack or appetizer. The beauty of these chips lies in their versatility; they’re perfect on their own for a guilt-free munch, or they can be a fantastic base for your favorite dips and toppings. Imagin extracte them paired with a fresh salsa, a creamy hummus, or even a dollop of guacamole. Don’t be afraid to experiment with seasonings – a sprinkle of paprika, garlic powder, or even a touch of chili flakes can add a whole new dimension to your Crispy Cottage Cheese Chips. Give them a try, and I’m confident you’ll be hooked on their delightful texture and subtle flavor. Happy snacking!
FAQs:
Can I make these Crispy Cottage Cheese Chips ahead of time?
Yes, you can! Once cooled completely, store your Crispy Cottage Cheese Chips in an airtight container at room temperature for up to 2-3 days. They tend to be crispiest within the first day or two.
What can I use instead of cottage cheese if I don’t have any?
While cottage cheese is key to the unique texture, you could experiment with other soft, mild cheeses like ricotta, but the texture and crispiness might vary significantly. Cottage cheese is highly recommended for the best results.
Crispy Cottage Cheese Chips
Easy and delicious baked cottage cheese chips that are crispy and flavorful. A healthy and satisfying snack.
Ingredients
-
1 cup small curd cottage cheese, drained well
-
1/4 teaspoon garlic powder
-
1/4 teaspoon onion powder
-
1/2 teaspoon dried herbs (such as thyme, parsley, or a mix)
-
Salt to taste
-
Freshly ground black pepper to taste
-
Olive oil spray
Instructions
-
Step 1
Drain the cottage cheese thoroughly in a fine-mesh sieve for at least 15-20 minutes, pressing gently to remove excess liquid. Transfer to a medium bowl. -
Step 2
Add garlic powder, onion powder, dried herbs (if using), salt, and pepper to the cottage cheese. Mix gently until well combined, ensuring seasonings are evenly distributed. -
Step 3
Preheat oven to 375°F (190°C). Line a baking sheet with parchment paper. Dollop small spoonfuls of the mixture onto the baking sheet, leaving space between them. Aim for about 1/4 inch thickness. -
Step 4
Lightly spray the tops of the cottage cheese dollops with olive oil spray. Bake for 15 minutes. -
Step 5
Carefully flip each chip. Continue baking for another 5-10 minutes, or until golden brown and firm. Watch closely to prevent burning. -
Step 6
Remove from oven and transfer chips to a wire rack to cool completely. They will crisp up further as they cool.
Important Information
Nutrition Facts (Per Serving)
It is important to consider this information as approximate and not to use it as definitive health advice.
Allergy Information
Please check ingredients for potential allergens and consult a health professional if in doubt.