Easy Creamy Pickle Roll Ups-Delicious Snack
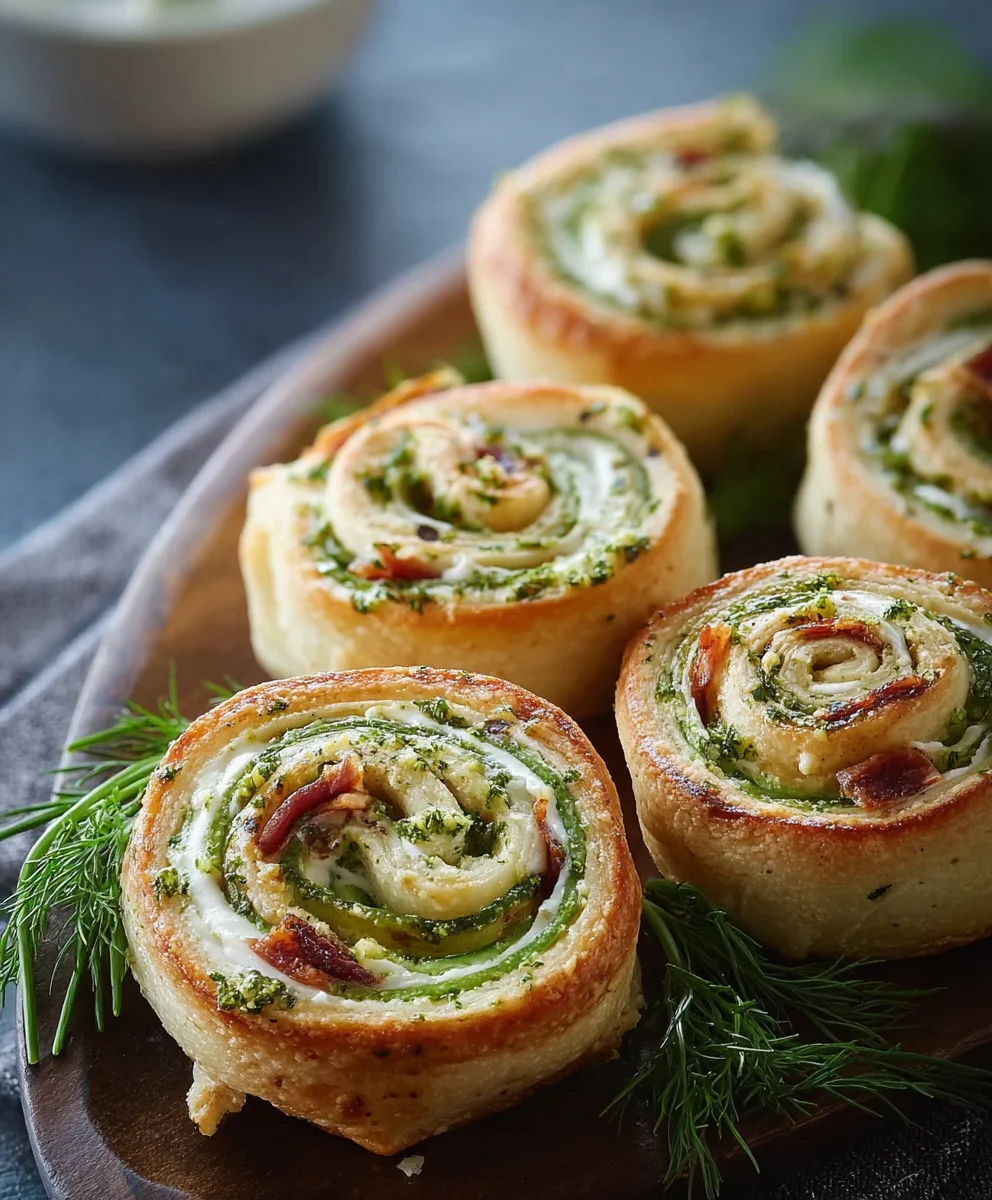
Creamy Pickle Roll Ups are undeniably the snack sensation that’s been taking social media by storm, and for good reason! If you’ve ever found yourself scrolling through your feed, mesmerized by their vibrant green hue and the promise of a flavor explosion, you’re not alone. These little flavor bombs have captured the hearts (and taste buds) of snack lovers everywhere, offering a delightful balance of tangy, savory, and surprisingly decadent notes. What truly sets these Creamy Pickle Roll Ups apart is their ingenious simplicity married with an unexpected depth of flavor. They’re incredibly easy to whip up, making them perfect for last-minute gatherings or a personal treat when a craving strikes. The creamy element, often a delightful cream cheese mixture, melds perfectly with the crisp, briny punch of dill pickles, creating a textural and taste sensation that’s utterly addictive. Get ready to discover why this simple yet sensational recipe is about to become your new go-to!
Ingredients:
- 8 ounces cream cheese, softened
- 2 tablespoons ranch seasoning
- ½ cup dill pickle relish or finely chopped dill pickles
- 16 ounces crescent roll dough (two 8-ounce cans)
- ¼ cup butter, melted
- 1 tablespoon fresh dill or 1 teaspoon dried dill
Preparing the Creamy Pickle Filling
The foundation of these delightful Creamy Pickle Roll Ups is a flavorful and tangy filling. Begin extract by ensuring your 8 ounces of cream cheese is nicely softened. This is crucial for achieving a smooth, lump-free mixture that will spread evenly. You can leave the cream cheese out on the counter for about an hour, or if you’re in a hurry, a quick trick is to cut it into smaller cubes and place them on a plate in a warm, but not hot, oven for a few minutes.
In a medium mixing bowl, combine the softened cream cheese with the 2 tablespoons of ranch seasoning. Use a spatula or a wooden spoon to vigorously mix these two ingredients together until they are thoroughly incorporated. You want to see a uniform color and texture, indicating that the ranch seasoning has fully blended into the cream cheese, creating a creamy, savory base.
Next, add the ½ cup of dill pickle relish to the cream cheese mixture. If you prefer a more distinct pickle flavor or larger pieces of pickle, you can opt for finely chopped dill pickles instead of relish. Fold the pickle relish into the cream cheese and ranch mixture. Be gentle here to avoid overmixing, as we want to maintain some texture from the pickles. Taste a small amount at this stage to ensure the pickle and ranch flavors are balanced to your liking. If you feel it needs a little more tang, you can add a tiny splash of pickle juice, but be careful not to make the filling too wet.
Assembling and Baking the Roll Ups
Step 1: Preparing the Crescent Roll Dough
Now, it’s time to work with the crescent roll dough. Unroll the two 8-ounce cans of crescent roll dough onto a clean, lightly floured surface. You’ll notice that the dough is typically perforated into triangles. Carefully separate these triangles. The goal is to slightly stretch and press these triangles together to form larger rectangular sheets. You can gently press the seams with your fingertips or use a rolling pin to lightly roll over the seams. This process will help create a continuous surface for spreading the filling and will prevent the roll-ups from falling apart during baking. Aim to create two larger rectangles, each approximately the size of a standard baking sheet, or as large as you can manage without tearing the dough.
Step 2: Spreading the Creamy Pickle Filling
Once you have your flattened crescent roll dough sheets ready, it’s time to spread the delicious filling. Divide the creamy pickle filling evenly between the two dough rectangles. Using an offset spatula or the back of a spoon, spread the filling thinly and evenly over the surface of each dough rectangle. Ensure you leave a small border, about ½ inch, along one of the long edges of each rectangle. This border will be important for sealing the roll-ups later and preventing the filling from oozing out too much during baking. Don’t worry if the filling isn’t perfectly uniform; a slightly rustic look is part of the charm of these roll-ups.
Step 3: Rolling and Cutting the Crescent Roll Dough
This is where the “roll ups” part of the name comes into play. Starting from the long edge that is opposite the clean bogin extractr, begin to tightly roll up each dough rectangle. You want to roll it as snugly as possible to create a compact log. Once you have a log, you can gently pinch the seam to seal it, especially where you left the clean border. For easier handling and more evenly sized roll-ups, you can transfer these logs to the refrigerator for about 10-15 minutes. This chilling step will firm up the dough and filling, making it much easier to slice without squashing. After chilling, use a sharp knife to cut each log into 1-inch thick slices.
Preheat your oven to 375 degrees Fahrenheit (190 degrees Celsius). Line a baking sheet with parchment paper. This will prevent sticking and make cleanup a breeze. Carefully arrange the sliced roll-ups on the prepared baking sheet, leaving a little space between each one as they will puff up during baking. Try to place them cut-side down if possible, although it’s not strictly necessary.
Now, it’s time to bake these amazing Creamy Pickle Roll Ups to golden perfection. Place the baking sheet in the preheated oven and bake for approximately 12-15 minutes, or until the crescent rolls are puffed up and a beautiful golden brown. Keep a close eye on them as oven temperatures can vary. While the roll-ups are baking, prepare the finishing glaze. In a small bowl, whisk together the ¼ cup of melted butter with the 1 tablespoon of fresh dill or 1 teaspoon of dried dill. If using fresh dill, finely chop it before adding it to the butter.
As soon as the roll-ups come out of the oven, immediately brush them generously with the dill butter mixture. The heat from the roll-ups will help the butter absorb beautifully and infuse them with an extra layer of herby flavor. For an even more intense dill flavor, you can sprinkle a little more fresh dill on top before the butter cools. Allow the Creamy Pickle Roll Ups to cool slightly on the baking sheet before transferring them to a wire rack. They are best enjoyed warm, where the cream cheese filling is melty and the pastry is delightfully flaky. There you have it! The recipe for delightful Creamy Pickle Roll Ups is now in your hands. We’ve walked through each step, from preparing the creamy filling to rolling and chilling these delightful bites. These Creamy Pickle Roll Ups are perfect for any occasion – a quick snack, a party appetizer, or even a fun addition to a picnic basket. They’re incredibly versatile and satisfyingly delicious! I encourage you to give this recipe a try. Don’t be afraid to experiment with the ingredients! Feel free to add a pinch of garlic powder to the cream cheese for an extra kick, or perhaps some finely chopped chives for a fresh, herbaceous note. Whatever you choose, I’m confident you’ll fall in love with the tangy, creamy, and savory explosion of flavors that Creamy Pickle Roll Ups offer. Absolutely! Creamy Pickle Roll Ups are excellent candidates for making ahead. You can assemble them a day in advance and store them in the refrigerator, tightly wrapped, before slicing. This makes them perfect for parties where you want to reduce last-minute stress. While dill pickles are a classic choice and work wonderfully in Creamy Pickle Roll Ups, you can certainly experiment with other varieties. Bread and butter pickles will offer a sweeter tang, and spicy dill pickles will add a welcomed heat. Just ensure they are firm and not too watery for the best results. Leftover Creamy Pickle Roll Ups should be stored in an airtight container in the refrigerator. They are best enjoyed within 2-3 days. The cream cheese filling helps preserve them, but the pickle brine can eventually make the tortilla soggy if stored for too long. A delicious and easy snack featuring a creamy, tangy pickle and ranch filling rolled up in flaky crescent dough and baked to golden perfection. It is important to consider this information as approximate and not to use it as definitive health advice. Please check ingredients for potential allergens and consult a health professional if in doubt.Step 5: Baking and Finishing Touches

Conclusion:
Frequently Asked Questions about Creamy Pickle Roll Ups:
Can I make these ahead of time?
What other types of pickles can I use?
How should I store leftovers?
Easy Creamy Pickle Roll Ups
Ingredients
Instructions
Prepare the filling: In a medium bowl, combine softened cream cheese with ranch seasoning. Mix until smooth. Stir in dill pickle relish or finely chopped pickles.
Prepare the dough: Unroll crescent roll dough and press seams together to form two large rectangles. Stretch and press slightly to create a continuous surface.
Spread filling: Evenly spread the creamy pickle filling over each dough rectangle, leaving a ½ inch border on one long edge.
Roll and cut: Tightly roll up each dough rectangle from the opposite edge of the border to create logs. Pinch to seal. Chill for 10-15 minutes, then slice into 1-inch thick pieces.
Bake: Preheat oven to 375°F (190°C). Arrange slices on a parchment-lined baking sheet. Bake for 12-15 minutes until golden brown.
Finish: While baking, whisk together melted butter and dill. Brush the warm roll-ups with dill butter immediately after removing from the oven. Serve warm.
Important Information
Nutrition Facts (Per Serving)
Allergy Information