Blackberry Pavlovas – Easy & Elegant Dessert Recipe
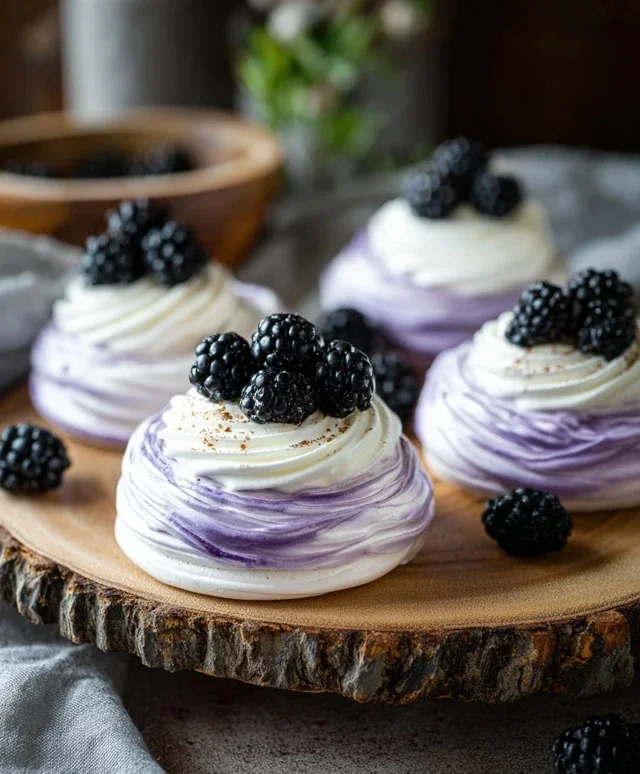
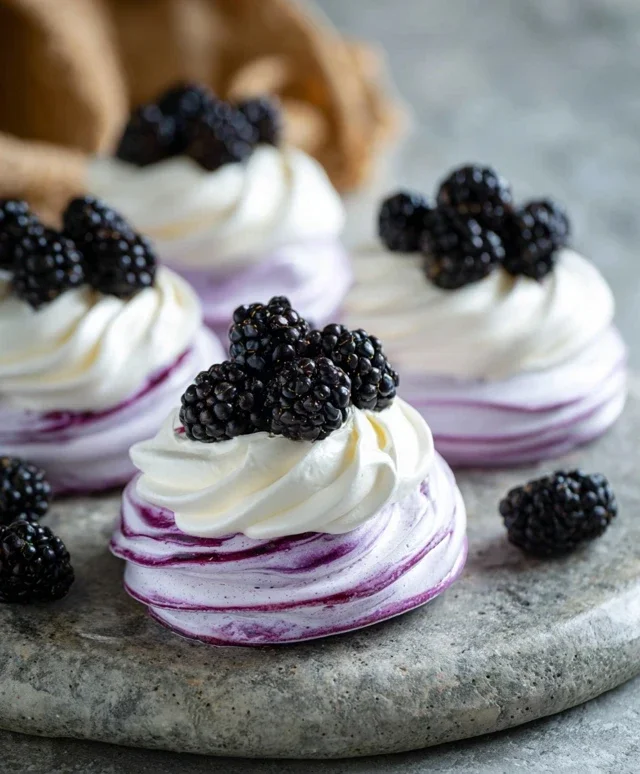
Blackberry Pavlovas are one of my absolute favorite desserts to create and share. There’s something undeniably magical about the contrast between the crisp, airy meringue shell and the burst of tangy, juicy blackberries, all softened by a cloud of whipped cream. It’s a dessert that speaks of elegance and indulgence, yet is surprisingly approachable. People are drawn to Blackberry Pavlovas for their stunning visual appeal – the stark white meringue juxtaposed with the deep purple berries is simply breathtaking. Beyond the aesthetics, it’s the textural symphony that truly captivates: the satisfying crunch of the outer shell giving way to a delightful chewy center, followed by the smooth, cool cream and the refreshing pop of the fruit. This recipe captures that perfect balance, ensuring your Blackberry Pavlovas will be a showstopper at any gathering, or a decadent treat just for you.
Blackberry Pavlovas
There’s something truly magical about a pavlova. That delicate, crisp meringue shell giving way to a soft, marshmallowy interior, topped with luscious cream and vibrant fruit – it’s a dessert that looks incredibly elegant but is surprisingly achievable. Today, we’re elevating this classic with the deep, tart sweetness of blackberries. These Blackberry Pavlovas are perfect for a special occasion, a summer gathering, or just when you want to treat yourself to something truly special. The vibrant purple of the blackberries against the snowy white meringue is a feast for the eyes, and the combination of textures and flavors is simply divine. Let’s get started!
Ingredients:
Making the Meringue Base
The foundation of any great pavlova is a perfectly baked meringue. This might seem intimidating, but with a few key tips, you’ll achieve that coveted crisp exterior and soft, chewy center. It’s crucial that all your equipment is scrupulously clean and free from any grease, as this can prevent the egg whites from whipping up properly. I like to use a metal or glass bowl for whipping, as plastic can sometimes retain grease.
1. Prepare Your Baking Sheet: Preheat your oven to 300°F (150°C). Line a large baking sheet with parchment paper. You can draw a circle on the parchment paper as a guide for shaping your pavlova(s). I usually aim for one large pavlova or 4-6 smaller individual ones. Using a template helps ensure an even bake and a beautiful presentation.
2. Whip the Egg Whites: In a clean, dry bowl, beat the egg whites with an electric mixer on medium speed until they form soft peaks. This means when you lift the whisk, the peaks will curl over. Gradually add the 1 1/4 cups of granulated sugar, one tablespoon at a time, while continuing to beat on high speed. You’ll want to beat until the meringue is thick, glossy, and the sugar has completely dissolved. To check for dissolved sugar, rub a little meringue between your fingers; it should feel smooth, not gritty. If you’re using the purple food coloring, add a few drops at this stage and gently fold it in to create swirls of color. Finally, gently fold in the 2 tbsp of cornstarch and 2 tsp of lemon juice. The cornstarch helps to create that lovely marshmallowy texture inside, and the lemon juice adds a touch of acidity that stabilizes the meringue.
3. Shape and Bake: Spoon the meringue onto your prepared baking sheet, shaping it into your desired form – a large circle or individual nests. Create a slight well in the center for the filling. Place the pavlova(s) in the preheated oven. Immediately reduce the oven temperature to 250°F (120°C). Bake for 1 hour to 1 hour and 30 minutes, depending on the size. The meringue should be dry to the touch and have a pnon-alcoholic ale cream color. Don’t be tempted to open the oven door during the first hour of baking, as this can cause the meringue to collapse.
4. Cooling is Key: Once baked, turn off the oven and leave the pavlova(s) inside with the oven door slightly ajar. This gradual cooling process is critical to prevent cracking and ensure a crisp exterior. Allow the pavlova to cool completely in the oven, which can take several hours or even overnight. Patience here is rewarded with a perfect pavlova shell.
Creating the Blackberry Compote
While our meringue is cooling, we’ll prepare the vibrant blackberry compote. This adds a burst of juicy, tart flavor that perfectly complements the sweet meringue and cream.
1. Cook the Blackberries: In a medium saucepan, combine the 2 cups of blackberries, 1/4 cup granulated sugar (or your chosen sweetener), and 2 tbsp of lemon juice. Cook over medium heat, stirring occasionally, until the blackberries start to break down and release their juices, about 5-7 minutes. You can gently mash some of the berries with the back of your spoon to help create a smoother compote.
2. Thicken the Compote: In a small bowl, whisk together the 1 tbsp of cornstarch and 2 tbsp of water until smooth. Pour this slurry into the simmering blackberry mixture, stirring constantly. Continue to cook, stirring, until the compote has thickened to a glossy, jam-like consistency. This usually takes another 1-2 minutes. Remove from heat and let it cool completely. As it cools, it will thicken further.
Assembling Your Blackberry Pavlovas
The final stage is where everything comes together. The contrast of the crisp meringue, the cool, airy cream, and the warm, fruity compote is simply irresistible.
1. Whip the Cream: In a chilled bowl, whip the cold heavy cream with an electric mixer on medium-high speed until soft peaks form. Gradually add the 1/4 cup of powdered sugar and the 1 tsp of vanilla extract. Continue to whip until stiff peaks form, but be careful not to over-whip, or you’ll end up with butter.
2. Assemble and Serve: Carefully place your cooled meringue shell(s) onto serving plates. Spoon a generous dollop of the whipped cream into the well of each pavlova. Spoon the cooled blackberry compote over the cream. Garnish with a few fresh blackberries and perhaps a sprig of mint for an extra touch of elegance. Serve immediately to enjoy the perfect textural contrast. Enjoy this delightful treat!
Conclusion:
There you have it! This Blackberry Pavlova recipe is truly a showstopper. Its delicate, crisp meringue shell giving way to a soft, marshmallowy interior, contrasted with the vibrant, slightly tart blackberries and luscious whipped cream, creates an explosion of textures and flavors that is simply irresistible. It’s elegant enough for a special occasion but surprisingly approachable for a weekend treat. I love serving these individual Blackberry Pavlovas as a stunning dessert after a summer barbecue or a festive holiday meal. The crispness of the meringue is best enjoyed within a few hours of assembly, making it a wonderful dessert to prepare most of components ahead of time.
Feeling adventurous? Don’t hesitate to experiment with other berry combinations like raspberries or even a mix of summer fruits. You could also add a drizzle of balsamic glaze for an unexpected sweet and savory twist. I truly encourage you to give this recipe a try. The satisfaction of creating something so beautiful and delicious is immense. Get ready for the compliments!
Frequently Asked Questions:
Can I make the meringue ahead of time?
Yes, you absolutely can! Once baked and completely cooled, the meringue shells can be stored in an airtight container at room temperature for up to 2 days. This is a great way to get a head start on your Blackberry Pavlova preparation.
My pavlova cracked, is it ruined?
Not at all! Cracking is actually quite common and often adds to the rustic charm of a pavlova. It doesn’t affect the taste or texture one bit. Just fill it with your whipped cream and blackberries, and no one will even notice!
Blackberry Pavlovas
Crispy meringue shells filled with luscious blackberry compote and whipped cream.
Ingredients
-
5 egg whites
-
1 1/4 cup granulated sugar
-
A few drops purple food coloring
-
2 tbsp cornstarch
-
2 tsp lemon juice
-
2 cups blackberries
-
1/4 cup sugar
-
2 tbsp lemon juice
-
1 tbsp cornstarch
-
2 tbsp water
-
1 1/2 cups cold heavy cream
-
1/4 cup powdered sugar
-
1 tsp vanilla
Instructions
-
Step 1
Preheat oven to 250°F (120°C). Line a baking sheet with parchment paper. -
Step 2
In a clean, dry bowl, whisk egg whites until stiff peaks form. Gradually add granulated sugar, one tablespoon at a time, whisking until glossy and firm. -
Step 3
Gently fold in purple food coloring, cornstarch, and 2 tsp lemon juice. -
Step 4
Spoon meringue onto parchment paper to form 6 individual pavlovas. Bake for 1 hour and 15 minutes, or until crisp on the outside and soft in the center. Turn off the oven and let cool completely inside. -
Step 5
While pavlovas cool, make the blackberry compote: In a saucepan, combine blackberries, 1/4 cup sugar, 2 tbsp lemon juice, 1 tbsp cornstarch, and 2 tbsp water. Cook over medium heat, stirring, until thickened. Let cool. -
Step 6
Whip heavy cream with powdered sugar and vanilla until soft peaks form. -
Step 7
Assemble pavlovas: Top each cooled meringue with whipped cream and a generous spoonful of blackberry compote.
Important Information
Nutrition Facts (Per Serving)
It is important to consider this information as approximate and not to use it as definitive health advice.
Allergy Information
Please check ingredients for potential allergens and consult a health professional if in doubt.