Cherry Cheesecake Hand Pies-Easy Delicious Dessert
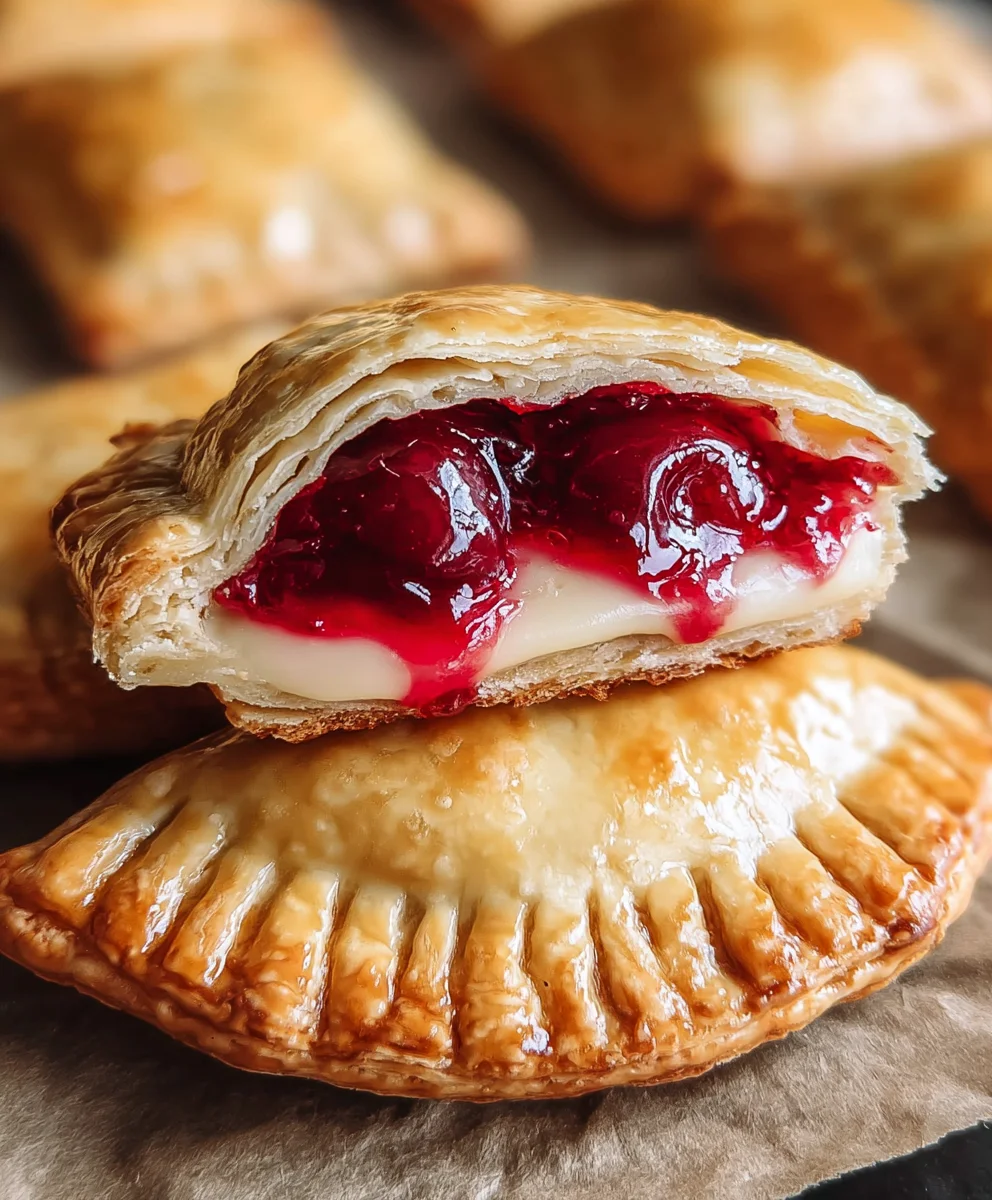
Cherry Cheesecake Hand Pies are more than just a dessert; they’re a delightful portable indulgence that captures the essence of a classic cheesecake in a perfectly portioned, hand-held treat. Imagin extracte the creamy, tangy richness of baked cheesecake, swirled with sweet, vibrant cherry filling, all encased in a buttery, flaky crust. What’s not to love? People adore these because they offer all the beloved flavors and textures of traditional cheesecake without the fuss of slicing or serving. They’re perfect for picnics, parties, or simply a satisfying sweet craving that can be enjoyed anywhere. The beauty of Cherry Cheesecake Hand Pies lies in their charming presentation and the sheer joy they bring with every bite, making them an instant crowd-pleaser and a personal favorite for anytime indulgence.

Ingredients:
- 1/4 cup granulated sugar
- 4 oz cream cheese, softened
- 21 oz can cherry pie filling
- 1 package refrigerated pie crust (2 crusts)
- 1/2 cup powdered sugar
- 1 teaspoon corn syrup
- 1 tablespoon water
- Vegetable oil, for deep frying (about 4-6 cups)
Preparing the Cherry Cream Cheese Filling
First, we’ll get our delicious filling ready. In a medium bowl, combine the softened cream cheese and the 1/4 cup of granulated sugar. Using an electric mixer or a whisk, beat these together until the mixture is smooth and creamy. It’s important that the cream cheese is truly softened for this step, as it will prevent any lumps from forming and ensure a velvety texture for your filling. Once smooth, gently fold in the entire 21 oz can of cherry pie filling. You don’t want to overmix this part; just stir until the cherries and their syrupy goodness are evenly distributed throughout the cream cheese mixture. This creates a wonderful swirl of creamy tangin extractess and sweet cherry goodness that’s perfect for our hand pies.
Assembling the Cherry Cheesecake Hand Pies
Now it’s time to assemble our hand pies. Open up your package of refrigerated pie crusts. You’ll find two crusts inside, which is exactly what we need. Carefully unroll each crust onto a lightly floured surface. Using a round cookie cutter, a glass, or even the rim of a small bowl (about 4-5 inches in diameter), cut out as many circles as you can from each crust. You should aim to get about 4-6 circles from each crust, depending on the size of your cutter. Place half of these circles onto a baking sheet lined with parchment paper. These will be the bottoms of our hand pies. Now, spoon about 1-2 tablespoons of the cherry cream cheese filling onto the center of each of these pie crust circles. Be careful not to overfill, or the filling might ooze out during cooking. Leave a small border around the edge of each circle so that you have space to seal the pies.
For the next crucial step in assembly, we need to seal these delicious pockets. Take the remaining pie crust circles and place one on top of each filled circle, creating a sandwich. Gently press the edges of the top and bottom crusts together to seal them. You can use your fingers for this, or for an extra-secure seal and a decorative finish, use the tines of a fork to crimp the edges all the way around. This will prevent any of that luscious filling from escaping during the frying process. Once all your hand pies are assembled and senon-alcoholic aled, use a small, sharp knife to cut a small slit or two in the top of each hand pie. This vent will allow steam to escape while they are frying, preventing the crust from puffing up too much and potentially bursting.
Frying the Hand Pies to Golden Perfection
We’re moving on to the fun part: frying! In a deep, heavy-bottomed pot or a deep fryer, heat about 4-6 cups of vegetable oil over medium-high heat. You’ll want to bring the oil to a temperature of around 350-365°F (175-185°C). If you don’t have a thermometer, you can test the oil by dropping a small piece of pie crust into it. If it sizzles and turns golden brown in about 30-60 seconds, your oil is ready. Carefully, using a slotted spoon or tongs, place 2-3 hand pies into the hot oil at a time. Be sure not to overcrowd the pot, as this will lower the oil temperature and result in greasy hand pies. Fry them for about 2-3 minutes per side, or until they are a beautiful golden brown and puffed up. Keep an eye on them, as they can go from perfectly golden to overcooked very quickly.
Once your Cherry Cheesecake Hand Pies are beautifully golden on both sides, carefully remove them from the hot oil using your slotted spoon or tongs. Place them on a wire rack set over a baking sheet to drain off any excess oil. This is important for achieving a crispy exterior. Allowing them to cool slightly on the rack will help maintain their crispness.
Creating the Sweet Glaze
While the hand pies are still warm (but not hot enough to melt the glaze instantly), let’s prepare a simple, sweet glaze to top them off. In a small bowl, whisk together the 1/2 cup of powdered sugar, 1 teaspoon of corn syrup, and 1 tablespoon of water. Mix until you have a smooth, pourable glaze. The corn syrup adds a lovely sheen and helps prevent the glaze from becoming too hard. If the glaze seems too thick, you can add a tiny bit more water, just a few drops at a time, until you reach your desired consistency. If it’s too thin, add a little more powdered sugar.
Once the hand pies have cooled slightly but are still warm, yogin extractan begin to drizzle the glaze over them. You can use a spoon to create zig-zag patterns, or for a more uniform coating, you can dip the tops of the hand pies into the glaze. The warmth of the pies will help the glaze spread beautifully. Let the glaze set for a few minutes before serving. The result is a delightful treat with a crispy, flaky crust, a warm, gooey cherry cheesecake filling, and a sweet, glossy finish that makes these Cherry Cheesecake Hand Pies utterly irresistible!
Conclusion:
We’ve reached the delicious end of our journey making Cherry Cheesecake Hand Pies! These delightful little pockets of sweet and tangy goodness are perfect for any occasion, whether it’s a special celebration or just a delightful afternoon treat. The creamy cheesecake filling beautifully complements the burst of cherry flavor, all wrapped up in a flaky, buttery crust. You’ve now got the skills to create these impressive desserts from scratch, and I hope you feel confident and excited to share them with loved ones.
For serving, these Cherry Cheesecake Hand Pies are fantastic on their own, warm or at room temperature. They also pair wonderfully with a scoop of vanilla ice cream or a dollop of whipped cream. For a delightful variation, consider adding a pinch of cinnamon to the crust for extra warmth, or a hint of lemon zest to the cheesecake filling for an added brightness. Don’t be afraid to experiment with different fruit fillings too – blueberry or raspberry would be equally divine!
I truly hope you enjoy making and, more importantly, eating these Cherry Cheesecake Hand Pies. They are a testament to simple ingredients coming together to create something truly special. Now go forth and bake with joy!
Frequently Asked Questions:
Can I make the dough for Cherry Cheesecake Hand Pies ahead of time?
Absolutely! The dough for your Cherry Cheesecake Hand Pies can be made up to 2 days in advance and stored in the refrigerator, wrapped tightly in plastic wrap. You can also freeze the unbaked hand pies for up to 3 months. Just thaw them in the refrigerator overnight before baking.
What if I don’t have fresh cherries for my Cherry Cheesecake Hand Pies?
No problem at all! You can easily substitute frozen cherries or even good-quality canned cherry pie filling for fresh cherries in your Cherry Cheesecake Hand Pies. If using frozen, you might need to drain off some excess liquid. If using canned, be sure to drain it well before incorporating it into the filling.
Cherry Cheesecake Hand Pies
Easy and delicious cherry cheesecake hand pies with a crispy crust and sweet glaze.
Ingredients
-
1/4 cup granulated sugar
-
4 oz cream cheese, softened
-
21 oz can cherry pie filling
-
1 package refrigerated pie crust (2 crusts)
-
1/2 cup powdered sugar
-
1 teaspoon corn syrup
-
1 tablespoon water
-
Vegetable oil, for deep frying (about 4-6 cups)
Instructions
-
Step 1
Prepare the cherry cream cheese filling by beating softened cream cheese and granulated sugar until smooth. Gently fold in the cherry pie filling. -
Step 2
Unroll pie crusts and cut out 4-5 inch circles. Place half the circles on a parchment-lined baking sheet, spoon filling onto the center of each, leaving a border. -
Step 3
Top filled circles with remaining crust circles, pressing edges to seal. Crimp edges with a fork and cut small slits in the top of each pie for venting. -
Step 4
Heat vegetable oil in a deep pot to 350-365°F (175-185°C). Carefully fry 2-3 hand pies at a time for 2-3 minutes per side until golden brown. -
Step 5
Remove fried pies from oil and drain on a wire rack. While warm, prepare the glaze by whisking powdered sugar, corn syrup, and water until smooth. -
Step 6
Drizzle or dip the warm hand pies in the glaze. Let the glaze set before serving.
Important Information
Nutrition Facts (Per Serving)
It is important to consider this information as approximate and not to use it as definitive health advice.
Allergy Information
Please check ingredients for potential allergens and consult a health professional if in doubt.